Overview of iTunes
If you don’t already have it, you need iTunes version 7.4. Here’s what you’ll find in this article:
- New features of iTunes
- New features of the iTunes Store
- New iPod synchronization and updating methods
The software industry moves swiftly, so it’s no surprise that by the time you read the 4th edition of my book, iPod and iTunes For Dummies (For Dummies (Computer/Tech) , iTunes would have evolved. Sure enough, iTunes version 7.4 packs in a lot more features.
First, a bit of history: iTunes was originally developed by Jeff Robbin and Bill Kincaid as an MP3 player called SoundJam MP (see “The True Story of SoundJam“), and released by Casady & Greene in 1999. It was purchased by Apple in 2000 and redesigned and released as iTunes. Versions of iTunes have been developed for mobile phones such as the Motorola ROKR, Motorola RAZR and Motorola SLVR. A new version was developed for the Apple iPhone.
Apple released version 7.0 on September 12, 2006. The gapless playback feature wasn’t quite working right (among other things, according to AppleInsider reports), so Apple updated the program; version 7.0.2 arrived on November 1, 2006. On March 4, 2007, Apple updated the program to version 7.1, providing support for Apple TV and offering a full-screen option for the Cover Flow cover browser, as well as improved sorting options to let you decide how iTunes should sort your favorite artists, albums, and songs. Apple also released QuickTime 7.1.5 which delivers numerous bug fixes and addresses critical security issues. On March 15, 2007, Apple fixed a few more bugs and released iTunes version 7.1.1. On May 30, 2007, Apple released version 7.2 and QuickTime Security Update 7.1.6 in order to provide support for purchasing higher-quality audio tracks without the Digital Rights Management (DRM) copy protection.
Since then, as everybody knows, Apple introduced the iPhone on June 29, 2007, and newer versions of iTunes (now up to version 7.4) and QuickTime (version 7.2). These are the versions of iTunes and QuickTime that I use now, and the versions I recommend.
Do we need these new features, such as gapless playback? Of course we do. We have concert CDs and albums such as the Beatles’ Sgt. Pepper’s Lonely Hearts Club Band that should be played in a seamless fashion. The tracks are separate, but the end of one song merges into the beginning of the next song. With these albums, you probably don’t want an annoying gap between the songs after ripping the CD into iTunes. So you can now set the Gapless Album option. It’s is getting better all the time.
Gapless playback is but one of many new features in iTunes that can improve your music library and your iPod experience. You can also manage multiple iTunes libraries, which makes it much easier to keep multiple iPods synchronized to different libraries. New versions of the iPod software also contribute to an overall improvement in iPod synchronization and playback.
The most up-to-date version of iTunes as of this writing is version 7.4. However, software updates occur very rapidly. If you really want the latest version, go directly to the Apple Web site to get it. You can download iTunes for free.
To download iTunes for Mac or Windows, go to the Apple iTunes download page, select the appropriate version (Mac or Windows), and then click the Download iTunes button, as shown in Figure 1-1. Follow the instructions to download the installer to your hard drive. Pick a location on your hard drive to save the installer.
If you’re a Mac user, you can use the Mac OS X automatic update feature to download the latest version of iTunes when it becomes available. Choose System Preferences in the Apple menu, and click Software Update in the Preferences window. Click the Check Now button to check for a new version. If one exists, it appears in a window for you to select. Select it and then click Install to download and install it.
If you use Windows Vista, see these instructions.
Navigating through and sorting your library
The iTunes window offers a view of your library and your sources for content, as well as controls for organizing, importing, and playing content. You can still browse your library in the same way as in previous versions. Figure 1 shows the iTunes window on a PC running Windows XP, using the Browse pane to browse by artist. Click the column headings in the Song List pane to sort the cover art by artist, album title, or any of the other view options.
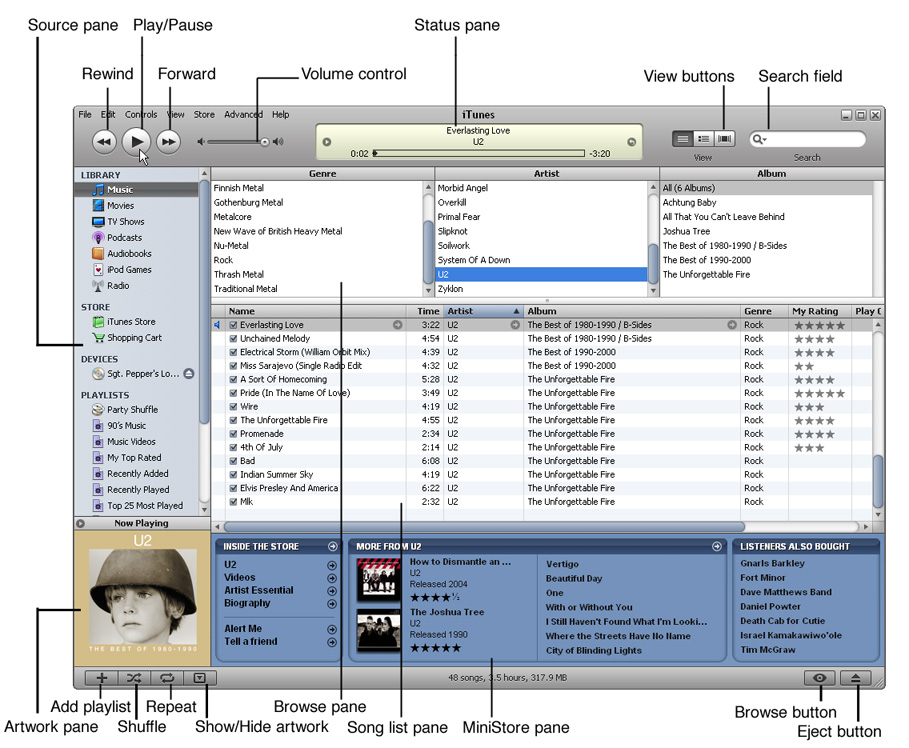
Figure 1: The iTunes window on a PC in Browse view.
Apple improved the traditional list view — iTunes now lets you sort the song list using the Album column. Each time you click the Album column heading (marked “Album”), the heading cycles through each of the following options:
- Album, which sorts alphabetically by album title.
- Album by Artist, which groups albums by artist and then lists them alphabetically
- Album by Year, which groups albums by artist and then lists them chronologically by year (set in the Song Information dialog)
iTunes can also show album covers on the left next to the list of songs, and TV shows now appear in the list organized by seasons.
As you can see in Figure 1, some controls have been added, some changed, and some moved to a new location in the window. Here’s a summary of the changes:
- Source pane: Displays the source of content, now handily divided into sections called:
- Library, which includes your Music, Movies, TV Shows, Podcasts, Audiobooks, iPod Games, and Radio
- Store, the iTunes Store and your Purchased list
- Devices, such as the “Sgt. Pepper’s” CD in Figure 1 and the iPod nano in Figure 2 named “TBone-Nano”
- Playlists, including Party Shuffle and your playlists
- Cover browser: The coolest new feature, also known as Cover Flow (see the following section, “Browsing by album cover“).
- Song List pane and Browse pane: Depending on the source that’s selected in the Source pane under Library, Store, Devices, or Playlists, these two panes (refer to Figure 1) display a list of the content in your library or a list of Web radio stations, the content available in the iTunes Store, the tracks of a music CD or the entire library on your iPod, or the Party Shuffle list or any one of your playlists.
- MiniStore pane: The MiniStore pane (refer to Figure 1) makes suggestions for what to get from the iTunes Store based on what you’re listening to. There’s no obligation to buy anything, and it never appears unless you want it to by choosing View>Show MiniStore. Choose View>Hide MiniStore to remove it.
- View buttons: The three buttons in the upper-right corner change your view of the Song List and Browse panes to show items in a list, grouped with cover art, or displayed with the cover browser.
- Browse button: The Browse button, relocated to the lower-right corner of the window, toggles between Browse view (with the Song List pane below and the Browse pane above with genre, artist, and album — refer to Figure 1) and the Song List pane by itself.
One fantastic innovation of iTunes is the way it integrates cover art from albums with your library so that you can flip through your albums to find music. The design of Cover Flow works well with the touch-screen iPhone and iPod touch — you can browse by album cover with finger gestures.
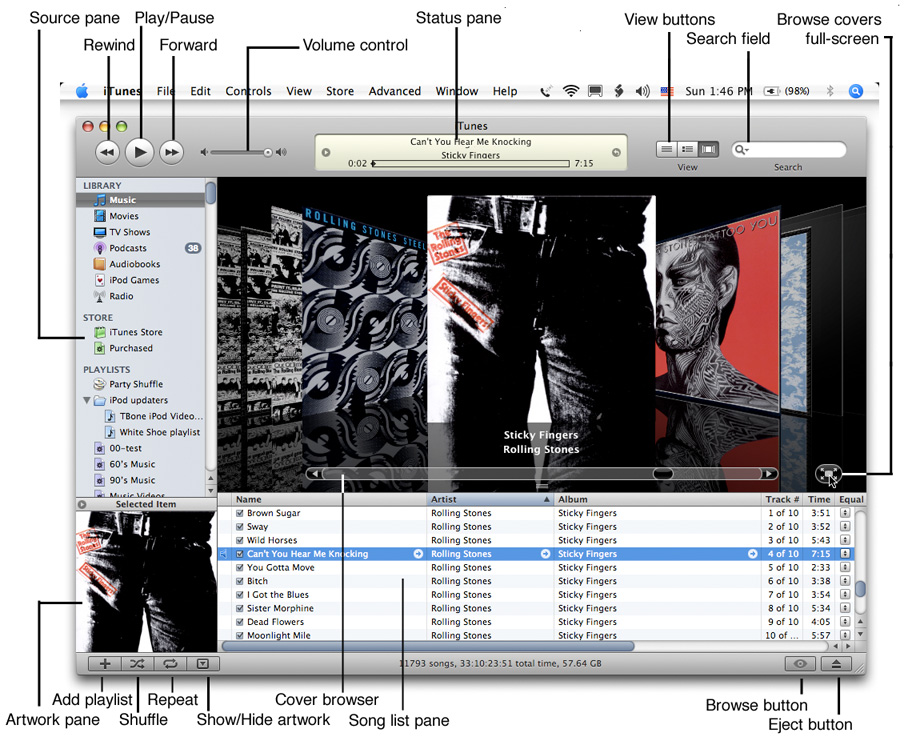
Figure 2: The iTunes window on a Mac with the cover browser open.
Figure 2 shows the iTunes window on the Mac with the cover browser open, displaying the cover art for albums. The Mac and Windows versions of iTunes look identical and offer the same viewing options, including the cover browser (also known by its older name, Cover Flow). The cover browser lets you flip through your cover art to choose songs. You can use the slider to move swiftly through your library, or you can click to the right or left of the cover in the foreground to move forward or backward in your library.
To fill your library automatically with cover art for the CDs you ripped, get yourself an iTunes Store account if you don’t already have one. Log in to your account; then choose Advanced>Get Album Artwork. iTunes grabs the cover art not only for iTunes Store purchases but also for CDs you ripped — provided the albums are also available in the iTunes Store. But you can also get your cover art from other places that sell CDs, including Amazon.com, or even scan them from the actual CDs. The optimal size for cover art is 300 x 300 pixels.
Consider setting up multiple libraries if you want to do any of the following:
- Divide a large library into separate libraries on separate hard drives. You can then automatically synchronize different iPods with each library.
- Create one or more smaller “sublibraries” of your main library on the same hard drive, sharing the same content folders and files as your main library. You can then automatically synchronize different iPods with each sublibrary.
- Separate your video collection from your music collection in order to store the larger video files on a different hard drive.
- Keep podcasts in a separate library that is updated more often than your “main” library.
- Keep all new content separate from older content.
Creating a sublibrary of the main library
You can create one or more smaller sublibraries of your main library on the same hard drive. You might want to do this if your main library is too large to fit on a single iPod and you don’t want to resort to manual synchronization — you can set up automatic synchronization with a sublibrary that fits entirely on the iPod. Since iTunes can create the sublibrary without copying content files, you don’t waste hard drive space with multiple sublibraries — they share the same files as the main library.
To create a new library, hold down the Option key on a Mac or the Shift key on a PC when launching iTunes. Then choose Quit, Choose a Library, or Create a New Library.
Choose Create a New Library to set up a new empty library. By default, the hard drive location of the iTunes folder for the newly created library is the same as the previously opened library — the folder is named “iTunes 1″ to distinguish it from the “iTunes” folder for the pre-existing library. As you add more separate libraries, the folders are named “iTunes 2″, “iTunes 3″ and so on.
After you create multiple libraries, hold down the Option key (Mac) or the Shift key (Windows) while launching iTunes whenever you want to switch between them. Otherwise, iTunes opens with the library previously opened.
You can import playlists and drag content from your iTunes folder into your new library without copying the content files — because ‘the files are in the same folder on the same hard drive. This makes it easy to consider your main library to be a Master library that links to the entire contents of the iTunes folder, and to create sublibraries for each iPod that share the same content files as the Master library.
Creating a separate library on a different hard drive
You can also create a new library that links to a different iTunes folder on a different hard drive, so that the content files are divided (not shared) between libraries. For example, you might want to put all video files on a separate hard drive in a separate library.
First, create the new library as described in the previous section. Then follow these steps to change the location of the new library’s content files:
- Choose iTunes>Preferences (Mac) or Edit>Preferences (Windows). The Preferences dialog appears with the tabs along the top.
- Click the Advanced tab and then click the General tab. The General tab appears.
- Click the Change button for the iTunes Music folder location. Your directory browser appears, enabling you to create and then select a folder to locate your iTunes content files. You can alternatively click the Reset button to reset the location back to the standard location in your user directory (the default setting when you first used iTunes).
- Create a folder for your content files and then select it. When starting a new library that links to another hard drive, create a folder somewhere on the other hard drive, call it “iTunes Music” or something similar, and then select it.
- Turn on the iTunes folder management options. Make sure the “Keep iTunes Music Folder Organized” option and the “Copy Files to iTunes Music Folder when Adding to Library” option are both selected.
- Click OK to close Preferences.
The new library links to the new folder location so that when you add new content to the library, the content is copied to the new folder. You can then copy all your videos from the first library’s content folder to the iTunes window, adding the content to the new library. iTunes copies the content files to the new folder.
Tip
Apple improved the CD/DVD backup features of iTunes so that you can make copies of your iTunes library, playlists, and iTunes Store purchases. You can choose to back up the entire library, perform incremental backups (only items added or changed since the last backup), or just store purchases.
Some CDs — particularly live concert albums and classical albums, rock operas like the Who’s Tommy (1969 Original Concept Album) by the Beatles — are meant to be played straight through, with no fading between the songs. Although you can cross-fade between songs automatically in iTunes, you can’t on your iPod. Previously, you had to use the Join Tracks option when ripping a CD to literally join the tracks together in your iTunes library, so that they would play seamlesssly on an iPod. (You can join tracks only when ripping a CD, not afterward.)
Fortunately, in iTunes you can turn on the Gapless Album option for multiple songs at once (such as “Side 1″ of an album). Songs set with the Gapless Album option play seamlessly from one song to the next in iTunes (whether or not cross-fading is turned on). You can also play these songs seamlessly on fifth-generation iPods (and second-generation iPod nanos) that have the latest software update. For older models, you still have to use the Join Track feature when ripping your gapless CD.
To turn on the Gapless Album option for multiple songs, follow these steps:
- Select the songs. Select the songs on the album to play continuously.
- Choose File>Get Info and click Yes in the warning dialog about editing multiple items. The Multiple Item Info dialog opens, as shown in Figure 3.
- Choose Yes from the Gapless Album drop-down list.
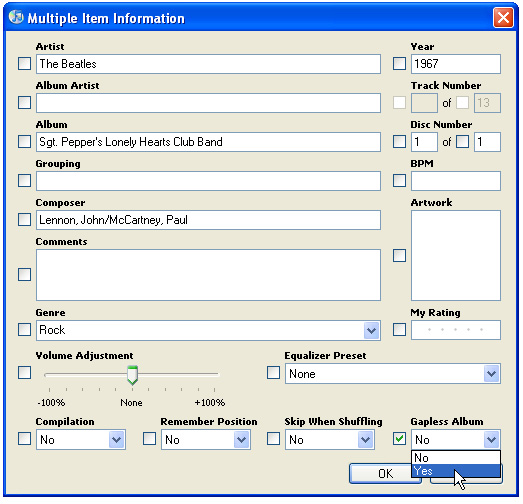
Figure 3: Turning on the Gapless Album option for the selected tracks.
To turn on the Gapless Album option for one song at a time, click the song and choose File>Get Info. Click Options and turn on the “Part of a Gapless Album” option for each song.
Tip
What if you turned on Crossfade Playback for playing songs in iTunes but you don’t want to cross-fade between specific songs on an album that has no gaps? You don’t have to keep turning Crossfade Playback on and off — simply deselect the Gapless Album option for those songs.
Keeping track of skipped songs
iTunes keeps track of the songs, audiobooks, and podcasts you skip — not to be polite, just to be useful. You can use this feature to sort the Music and Audiobook sections of your library in List view, thereby making it easier to select and delete the items you skip. (The Skip Count doesn’t count how many times you skip videos, TV shows, and movies.)
Besides the usual view options for the iTunes’ List view (Ctrl-click or right-click the list view column heading bar to see them, or choose View>View Options), you can now view and sort by the Skip Count, which keeps track of how many times you’ve skipped the song within the first 19 seconds using the Forward/Next button (clicking a new song doesn’t count). You can also view and sort the song list with the Last Skipped view option in View Options, which shows the date and time when you last skipped the song.
Tip Another way to select and delete items that have a high skip count is to create a smart playlist and select the criterion Skip Count. Choose an operator, such as “Is Greater Than,” and specify the number. You now have a smart playlist of the items you skip over — which you can use to annoy your friends, annoy yourself, or assemble items to delete from your library. To delete items in the smart playlist completely from your library, select them and press @@cmd-Option-Delete on a Mac or Ctrl-Alt-Backspace in Windows.
Tip Is your smart playlist too darn smart? Maybe you really like the list it generated, but you want to simplify it — preserve it as a regular playlist. You can now quickly convert a smart playlist to a regular one: Drag and drop the smart playlist’s name in the Source pane directly over the Playlists heading in the Source pane.
Shopping with convenience at the iTunes Store
After you’ve deleted items you no longer want in your library, you can fill your library with new content from the iTunes Store. The look and feel of the iTunes Store has changed, but most of its functions remain the same.
One change that is subtle and yet extremely important is its name. No longer is the online store called the “iTunes Music Store”. “Music” has been dropped not because there is no music (there are millions of songs, and Apple has sold more than two billion as of January 2007), but because the store sells much more than music. You can now purchase and download feature-length movies as well as TV shows, and the store even offers games you can play on your iPod.
Another important change is the introduction of copyright-free music. The new iTunes Plus portion of the online iTunes Store offers higher-priced, higher-quality, DRM-free songs and albums you can play on any device and copy endlessly. The songs and albums do not replace DRM-protected songs currently sold through iTunes at the older price ($0.99 per song) — you now have a choice. And if you purchased DRM-protected songs at 99 cents apiece, you can upgrade them to the new format for 30 cents apiece. Apple is using a higher bit rate (256 kilobit-per-second) with the AAC format, so the files are larger. I use the same 256 kbps rate with either AAC or MP3 when I rip CDs, so now the purchased music is at the same quality as my ripped music.
You can visit the iTunes Store by connecting to the Internet and using iTunes or America Online (AOL). You can even click a Launch iTunes Store link on the Apple Web site or a similar link on Web sites that are iTunes affiliates with songs for sale (such as Rockument). The link automatically launches your installed copy of iTunes and opens the iTunes Store.
iTunes Store uses the Song List and Browse panes to display its wares (see Figure 4). It provides buttons on a gray bar just above the advertised content in the Song List pane. The left and right triangle buttons work just like the Back and Forward buttons of a Web browser, moving back a page or forward a page. The button with the Home icon takes you to the iTunes Store home page. The familiar Browse button in the lower-right corner switches the view between Browse view (with the Song List and Browse panes both open) and Song List view (with only the Song List pane open).
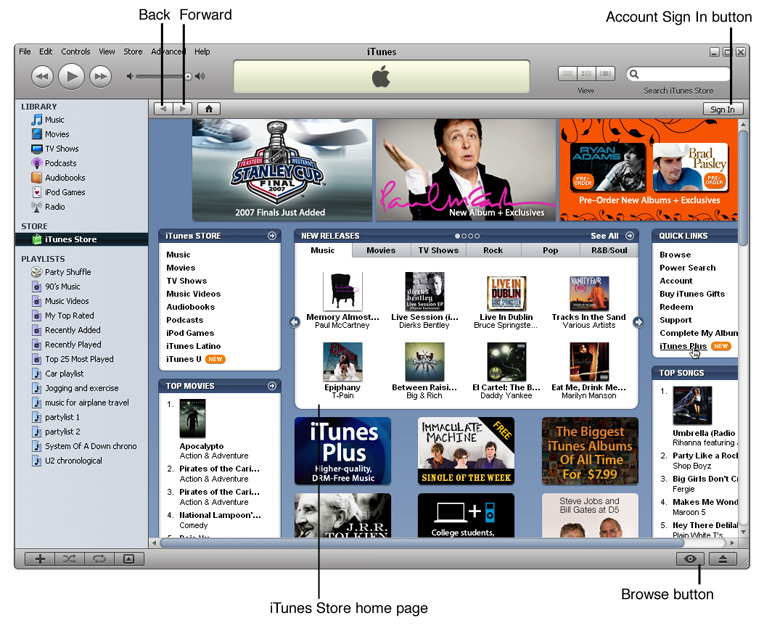
Figure 4: The iTunes Store home page.
The iTunes Store now offers parental controls that let you disable various sections and the purchase of various content based on PG/TV rating. It also offers an option to immediately burn a disc backup of the content you purchased.
Tip
For the impatient viewers, the iTunes Store lets you start watching a video or movie before it finishes downloading. Click on Downloads as you’re downloading and double-click the item to watch it. The download continues as you watch from the beginning.
You can check your download speed when downloading multiple items — click the gray text under one of the items that hasn’t yet started to download to see the speed in parenthesis before the minutes remaining.
Updating and synchronizing your iPod
You can now use iTunes to update your iPod software, as well as synchronize your iPod with your library and control the copying of content to your library. Apple put the iPod Updater inside iTunes, so you no longer need to use a separate application. Apple also improved the way iTunes presents all of your content synchronization options.
When you select an iPod in the Source pane, as shown in Figure 5, iTunes uses the entire content pane to show iPod synchronization options for the types of content that work with that iPod — music, movies, TV shows, podcasts, photos, contacts (which includes your calendars), and games.
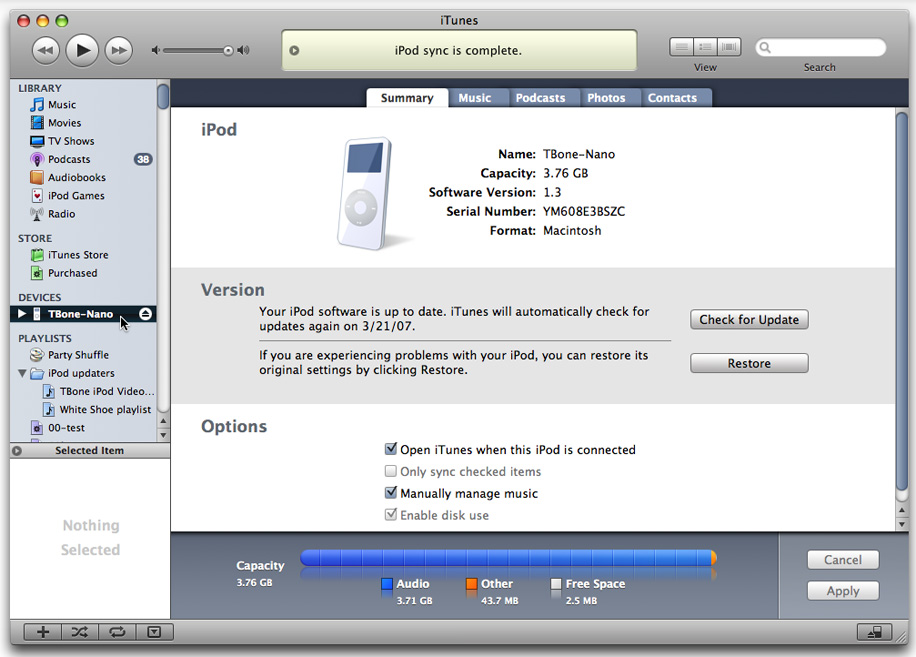
Figure 5: The iPod nano pane of synchronization options.
The Summary tab of the Synchronization Options pane includes the Version section that provides the functions formerly associated with iPod Updater. It tests your iPod to see whether it has the latest update, and it provides the Update and Restore buttons. iTunes automatically downloads updates to the iPod software and offers to update your iPod as soon as you connect it.
Apple thoughtfully included a space meter at the bottom of the iPod Synchronization Options pane that shows not only how much space you have remaining, but also the types of content taking up all the space — music is shown in blue, video in purple, photos in yellow, and other types in orange (free space is white).
If your iTunes library is too large to fit on your iPod, you can still update automatically and keep your iPod synchronized to a subset of your library (or you can create multiple libraries, as described in the earlier section, “Managing multiple libraries“). iTunes makes it easer to specify playlists, selected songs, movies, TV shows, photos, and podcast episodes. Apple improved the synchronization of TV shows by offering options such as “5 Most Recent” and “5 Most Recent Unwatched” — for folks like you who can’t stand to miss these episodes.
Tip
Apple also lets you copy your purchased music in an iPod to another computer that’s authorized to play the purchased music. Simply connect the iPod and choose File>Transfer Purchases From “[Your iPod name here]”. This feature would come in handy if you accidentally deleted the purchased music from your iTunes library.
Looking into the Future
Version 7.4 of iTunes is ready to accommodate some of the future directions Apple is taking the iPod product line, especially the touch-screen iPod touch, announced on Sept. 5, 2007 and expected to be available a month later. For example, the cover browser works on the iPod touch as well as the iPhone, activated by finger on the touch-screen, and is also available on the new iPod classic and iPod nano, controlled by the click wheel. The cover browser makes sense for these devices and really works well for navigating albums.
Of course, the iPhone and all iPod models synchronize with your computer through iTunes. Other Apple products, such as Apple TV, also connect to your iTunes library. In other words, iTunes is fast becoming the center of your media universe. The Source pane will no doubt connect you to a variety of iPod-like devices in the future. In fact, even iTunes might undergo a name change someday, as it deals now with all types of media content. So expect iTunes to evolve even further, stay tuned to my blog for more information.
For reviews and more detailed commentary on iTunes, see these articles:
- Apple site: Apple Announces iTunes 7 with Amazing New Features
- MacDailyNews: Report: Apple iTunes 7 update coming soon
- The Unofficial Apple Weblog: iTunes 7’s Big New Features
- Macworld: iTunes remixed by Christopher Breen
- Playlist: Review: iTunes 7 also by Christopher Breen